Thursday, May 11, 2017

The Amateur Bike Mechanic's Workbench

Park Tool PCS-10


Park Tool PCS-10 Work stand with carbon-frame bicycle held by seat post
Bicycles aren't really particularly finicky machines. Well-constructed rides can survive benign neglect for quite a while before “demanding” a tune-up, especially if they're rarely used. You’re wise to keep up your lubrication, but you might not notice problems if you don’t ride much. If you ride more than a few times a summer, though, you’re aware that regular maintenance and cleaning are absolute musts. You need a stand for those chores; one like the Park Tools PCS-10 Home Repair Stand.

The PCS-10 is considered a portable stand because it folds for storage and transport. It suspends mountain, hybrid, cyclocross, gravel, tri, or road bikes (cruisers and recumbents, too) from a top-mounted clamp that grasps tubes ranging from 7/8 to 3 inches in diameter. Lift height ranges from 39 to 57 inches, high enough to position most bikes for easy access to any component. A cam-operated, padded clamp locks the bike in place while the three-point leg system keeps everything stable. Loosen a pair of quick-release clamps, fold the legs, and the PCS-10 collapses to a compact 41” tall, small enough to lean in a corner. The quick-releases are the stand’s chief difference with the less-expensive PCS-9.

     The clamp is the heart of the PCS-10. Padded jaws, three inches wide, grasp any tubing gently – seat, top, down, head; or the seat post for a carbon frame. It closes with a slick cam arrangement to avoid over-tightening; and the whole mechanism rotates through a full 360° to lock the bike at any angle.

The PCS-10 comes disassembled in a large, 25-pound box with the tools needed for assembly. The included instructions are, sadly, a little tough to follow. They are, however, printed in four languages… Assembly takes fifteen to twenty minutes, much of which is spent flipping the paper back and forth between text and illustrations.

When assembled, the PCS-10 is an engineering marvel. It’s sturdy – its three-point stance makes it nearly impossible to tip over – and versatile. You can mount the bike in any position, rotate it while clamped in place, and raise and lower the stand easily. The footprint is large when opened (for stability), but once folded the stand is about the size of a smallish golf bag.     

Park accessories for the PCS-10 include a couple of work trays for tools (got one), a paper-towel holder (got it), a wheel truing attachment (need one), and a nylon carry bag. Fun fact: Park has trademarked this color of BLUE (their caps).
copyright © 2017 scmrak

Tuesday, May 2, 2017

Indy's Monon Trail: Love It? or Hate It...

Monon Trail Sign Carmel Indiana
If you live anywhere near Indianapolis you know about the city's Monon Trail, even if you haven’t ridden a bicycle in thirty years – maybe even fifty years. It’s that rails-to-trails project that follows the abandoned Monon Railroad tracks from just east of where Mass Ave meets 10th Street downtown to a current terminus in northern Hamilton County. As of this writing, it’s officially 19-plus miles long, ending near IN 32 and US 31 in Westfield. A bit more than ten miles of the Monon are in Marion County, where the trail is generally considered the jewel of Indy’s bike paths. Some local cyclists, however, say it's a rhinestone at best.


Here are some reasons to avoid the Monon


Safety: Between the south end and where the trail crosses White River north of Broad Ripple, there are at least twenty at-grade street crossings, ranging from sleepy 17th Street to six lanes of fast-moving traffic at 38th Street. That includes a bizarre three-corner crossing of Westfield and Riviera in downtown Broad Ripple. Cyclists and pedestrians are routinely struck or just missed in many of the crossings, which are marked simply by signs saying “Pedestrian Crossing” and “Monon Trail,” plus the occasional blinking yellow light. Only Kessler Boulevard and Fairfield Avenue rate bridge crossings, which use former Monon railroad bridges. Besides the ever-present danger of car-bike accidents (there are already ghost bikes at 20th and 75th), stopping for a street every two blocks plays hell with your average speed…

      There's an equally frustrating set of street crossings in downtown Carmel, with three street crossings in 1/8 mile including very heavy Main Street traffic.

Amenities: Although water and bathrooms are more common in Hamilton County (starting with a  nicely-appointed rest station where the trail crosses 96th Street), trail users coming from downtown will not find water along the trail until the entrance to the Deaf School at 42nd Street (3.6 miles) and won’t find a public restroom until Canterbury Park at 56th Street (5.2 miles). A few bike repair stations are scattered along the trail (e.g., at 52nd Street and the Fall Creek bridge), but the tools and pump have often been stripped or destroyed. Emergency telephone stations can be found at regular intervals south of 38th Street.

Hanging a little over the center line, Blondie?
Traffic: It goes without saying that any cyclist hoping to make good time should avoid the trail on weekends and around lunchtime. Through SoBro and Broad Ripple the trail is crowded with pedestrians, some of whom walk in groups of four or five abreast. Children and, to a lesser extent, dogs often dart into the path of unwary cyclists. You need to be especially wary around venues like Broad Ripple Ice Cream Station, where BRICS patrons have been seen wandering blindly around the path nursing their ice cream headaches.

Some people absolutely love the trail


Long open stretches can be found, if that’s your bag. Take, for instance, the wooded trail adjoining Marott Park and the Blind School north of Broad Ripple, with only a stoplight-controlled crossing at 75th Street to break up the 2¾ miles between 65th and 86th Streets. Up in Carmel, busy street crossings are made safer by bridges (Carmel and City Center Drives) or underpasses (116th, Meridian, and 146th). There's also park access along or near the trail for much of its length (Canterbury, Broad Ripple, and Quaker Parks).

      Ice cream riders really have no excuse not to stop at BRICS, and restaurants can be found at almost every street crossing between 52nd and White River, with dozens easily accessible in the Broad Ripple area – though there are far fewer in the industrial sector between 10th and 38th. Speaking of industrial areas; if you like the smell of heated wood, Wooley Lumber’s kilns at 30th Street will warm the cockles of your heart.

Local art abounds in the murals on trail-side buildings between 52nd and 54th, as well as lots of unusual backyard art in trail-side homes. Jordan YMCA users enjoy an easy-access entrance to the trail at about 82nd Street.

The bottom line


Overall, the trail is well cared-for – better than the city’s streets a lot of the time. It’s so well cared-for that other trails in the city suffer greatly by comparison: ride the Fall Creek Trail some time and you’ll probably find fallen limbs and low-hanging vines, even in the sections that are passable (which rules out much of the section between 56th and Keystone). After the same storm, the Monon is quickly swept of fallen twigs and leaves like a street in Singapore.

One thing that bothers me as both a cyclist and a driver… after a “young girl” was struck by a car at the 111th Street-Monon crossing, the Indianapolis Star said,
pedestrian crossing stop sign
“The intersection is marked as a crosswalk with yellow flashing lights with a pedestrian-crossing sign. Once pedestrians or bicyclists stop, determine it's safe to cross and proceed into the crosswalk, they have the right of way under state law. Traffic must yield to pedestrians in crosswalks by slowing down or stopping.”
From long experience, I’m aware that many drivers are unaware of that section of the traffic code; and a frightening few are “aggressively” ignorant. Given the popularity of this trail and the dangers to its users from inattentive drivers, why Indianapolis refuses to use traffic signs such as the one shown at right at the Monon (and other at-grade crossings) remains a mystery to me.
copyright © 2017-2019 scmrak

Sunday, April 16, 2017

Who Wins When a Bicycle and Car Collide?

Ever wondered? Well, as of just last week, I can tell you from personal experience. But I won't: instead, I'll just show you a couple of pictures for comparison...

This is what happens when someone bumps into your truck in an apartment complex parking lot...


...and this is just some of what happens when someone chatting on a cell phone cuts off a cyclist while making a right turn across a bike lane:


...Any questions?
copyright © 2017 scmrak

Friday, December 16, 2016

You, Too, Can Be Seen with a Flashy Taillight

Planet Bike Blinky SuperFlash Rear Bike Light


     If you ride a bicycle in traffic, you've probably noticed that many urban drivers aren't bike-friendly. It's not (usually) hostility, it's distraction: they don't shift to attack mode upon seeing a cyclist, they simply don't see us. A wise rider does whatever it takes to be noticed by folks thumbing iPhones or wiping goo off Baby's chin while driving. Flashy jerseys are a passive method; but in enemy territory, by which I mean most urban settings, you'd better take active measures. My first rides in the city where I used to live (Houston) were nerve-wracking, so I dropped into my LBS for something that would attract attention before my rear wheel disappeared under a bumper. My choice? A Planet Bike Blinky SuperFlash Light for rear mounting.
The SuperFlash is a small three-LED light in a plastic housing with padded clamps for either seatpost or seatstay. Installation takes a couple of minutes and a screwdriver. The housing is about three inches high, one inch wide, and one inch thick; shaped like a keyhole. Two LED lights are located on the vertical, with a third, focused by a parabolic mirror, in the center of the round top. A pair of AAA batteries (included) power the light or you can buy one that recharges from a USB plug for about twice the price. Including the batteries, total weight is fifty grams.

The light has is a three-position switch: off, steady, and flashing. When flashing, the bottom two LEDS blink at one rate, while the upper LED flashes at a different, faster pattern. Planet Bike says that batteries will last for 50 hours with steady use, and 100 hours flashing. Mine lasted more than two years before I had to replace them. Some users claim that the light can pop out of the mounting on rough surfaces, but mine snaps in place and stays there. It's not certified waterproof, so rainy weather may cause problems.

This is a heckuva bright light: I wouldn't be caught dead (well, actually I probably would be) riding in most cities after dark, but I use this for daylight rides on "share-the-road" streets and marked bike "lanes" (the "dirty bike stripe"). I've had almost no close calls from the rear with it working (wonder if I can mount one on the front?), because even in bright light the irregular flash pattern and that super-bright red upper light get a driver's attention. I've seen these on bikes while driving, and even in broad daylight they're noticeable from several hundred feet away. On gray days, I've been known to mount mine on the back of my helmet to get it up level with drivers' eyes.


Overall, it's a fine safety device for urban riders. The eye-catching flash pattern and superbright light should catch the attention of distracted drivers, day or night. The light may be a bit expensive, but so's major surgery.
copyright © 2016-2017 scmrak

Sunday, December 11, 2016

A Beginner's Guide to Houston's Terry Hershey Trail, Part 1

OK, so you're not one of the bony types who hang out in the break room at the office hitting up all their co-workers for a pledge to this year's 180-mile BP MS150 between Houston and Austin. You don't own a single item of Spandex®, and your bike weighs about the same as a set of the Encyclopedia Britannica. That doesn't mean you can't get out on your bike and enjoy the fresh air while you get some exercise. If you live or work near Houston's Energy Corridor, you have a great opportunity right at your doorstep: the Terry Hershey Trail.

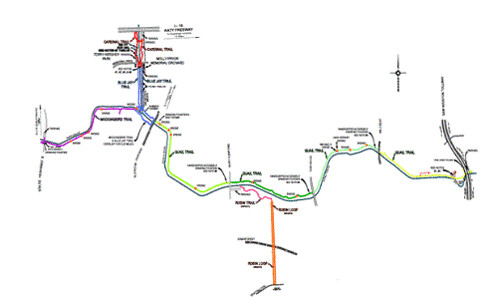
Managed by Harris County Precinct 3, the paved trail follows the banks of Buffalo Bayou from the foot of the Addicks Dam (at George Bush park) to a terminus at the Sam Houston Tollway (Texas 8), a distance of some 6.5 miles. In 2013, the county added an arm to the trail that provides access to the Addicks Park-n-Ride lot. The main trail is separated  into five more or less equal sections by major north-south streets: from the West, they are Eldridge parkway, Dairy Ashford Road, Kirkwood Road, and Wilcrest Drive.

Section 1 - Bush Park to Eldridge Parkway


The trail runs along the south side of Buffalo Bayou through a lightly wooded area. There are several bridge crossings at small drainages: watch for a "step" of up to an inch where the path meets the concrete pad (the precinct fills these occasionally, but they soon redevelop). At about one mile, a footbridge across the Bayou (see right) leads to the 500-acre Terry Hershey Park on Memorial Drive. That path loops back to meet the main Hershey Trail just west of Eldridge, about a one-mile loop. There are drinking fountains (human and dog) along the loop trail and even a shower to help cool down runners.

The west end of the so-called "anthill," used by fat-tire enthusiasts, parallels the paved trail off to the right (south) through this section. After a rain, be wary of heavy mud coating the trail in spots where the off-road trails veer to the side and uphill.

Parking is available north of the Bayou on the west side of Texas 6. To reach the trailhead, you must cross the Highway 6 bridge on a narrow, one-lane sidewalk. Parking is also available at the park on the north side of Memorial as well as along Memorial Mews south of Memorial. Restrooms, water, and picnic tables are available at the park; only picnic tables can be found at the western end and a water fountain near the zero mile marker.

Section 2 - Eldridge Parkway to Dairy Ashford Road


The trail runs along the north side of the Bayou from the east side of Eldridge to the other end. Eastbound cyclists can reconnect with the main trail by crossing the Bayou on the Eldridge bridge (only wide enough for one bicycle!) and turning left to loop under the roadway. A restroom with drinking fountains sits just east of Eldridge, and you can also connect with a bicycle route that follows Enclave Parkway. This section of the trail is also mostly flat, though there are a few slight inclines and several sharp turns.

Parking is available at Dairy Ashford on the south side of the Bayou; to reach the trail you must cross the bridge either on the road surface (not a good idea) or on an open sidewalk. At the west end, some folks park in the Kendall Library lot on the northwest corner of Eldridge and the Bayou (preferably when the library is closed). There are no restroom facilities in this section, nor is there water. Benches and picnic tables can be found all along the paved trail.
There is access to the Robin Trail, a 1.8-mile loop (mostly crushed granite) at the east end of the Dairy Ashford parking lot. The Robin Trail connects with a city bicycle lane on Briar Forest Drive, about half a mile south. If mud's your thing, you can connect with the dirt trails through the woods on the south side of the Bayou by dropping down the banks on the east side of the bridge.

Trail Etiquette


Cyclists must yield the right of way to everyone, even if they're hogging the trail. Watch for loose dogs (in defiance of park rules) and new moms weaving around with strollers while texting. Be safe: announce your presence to pedestrians and other cyclists before passing, and never stop and stand on the trail.     

Coming Next: The rest of the trail...

copyright © 2016-2017 scmrak

Wednesday, November 9, 2016

Flat Tire on Your Bike? Comparing Four Patch Kits

Flat Tires are an Inevitability


Explorers in the new world, history would have it, spent years questing for the fabled Cibola, a city whose streets were said to have been paved with gold. They never found it. If those same explorers were to come to the city where I used to live (Houston), they might think the streets were paved with diamonds because of their sparkle in the rays of the morning sun. The glitter isn't diamond-studded pavement, though: it's acres of broken glass, the legacy of a city that owns no street sweepers and depends on torrential rains to wash debris from the local roadways.

Tuesday, November 8, 2016

Road Bike Essentials, Part 1: Comfort and Safety

So you just bought a new road bike? Well, congratulations! Now that you’ve brought that new toy home from the store, you probably think you're ready to ride. Whether you plan to ride out in the country, on neighborhood streets or on the city trails; the addition of some accessories will make your ride safer and more comfortable. So you might want to head back to the store: here are five (or so) items that are guaranteed to enhance.

Always Ride with a Helmet


I've been heard to say that cyclists can show their brains one way or another, by wearing a helmet or not. Helmets are the number one item of safety equipment for anyone on a bike. Don't be fooled, though: the number one safety rule is to ride smart.

A road helmet is lightweight and has plentiful openings that allow flow-through ventilation. A helmet with a visor isn’t suitable for road cycling, because the visor may block a rider's vision when bent over the handlebars. Because of that, some helmets have a removable visor. Either way, choose a helmet that fits well and is comfortable, one that can be adjusted so it fits over a headband in summer and a heavier skullcap when the weather turns cool.


Hydration: It’s Essential


Combine an inexpensive water bottle cage that mounts on the bike frame with a plastic water bottle, and you'll be set for short rides. For a longer ride, you may want to invest in a hydration pack such as the one shown here, manufactured by CamelBak.

Purists like to scoff at any rider wearing a hydration pack, but more often than not those same purists end up scrounging for water at convenience store prices. Hydration packs carry not only several liters of water from home (plus ice, if you like), but they also provide additional pockets for carrying cell phones, identification, cash, tools, tubes, patch kits and the like. Models designed for cyclist use like the CamelBak Lobo (right) and CamelBak M.U.L.E. are form-fitting and lie close to the back, which cuts down on wind resistance.


Gloves Provide Comfort and Protection


When you're in the proper riding position, up to one third of your weight is resting on your hands; so doesn't it make sense to put some padding between you and your handlebars?

A pair of well-fit cycling gloves is padded at several pressure points around the palm of the hand and on fingers and thumbs. The padding should let you shift your hands around in several positions on the handlebars and shifter hoods and still stay padded. Modern gloves use gel for shock absorption, which helps prevent keep your hands from falling asleep mid-ride. Road gloves for warm-weather use leave the fingertips exposed. Full-finger gloves are more common for mountain biking and/or cool weather. Good gloves come with an absorbent patch on the thumb so you can wipe sweat from your brow while riding.


The Long and Shorts of It


You may be of the opinion that those Spandex® shorts look silly, but your butt – not to mention neighboring bits – will be thankful when you wear padded bike shorts on longer rides. Tight-fitting, sleek bike shorts don’t just pad your hiney, they reduce wind resistance and the form-fitting cut reinforces quads and hamstrings on extended rides. Bike shorts come in men's and women's styles, and are intended to fit tightly -- very tightly. For your first pair, you'd be wise to visit a good local bike store to find some that fit properly and are comfortable. They're expensive, but they're worth it and they also last more than one riding season, so you can amortize the purchase over several years.

Don't wimp out and buy a pair of baggy shorts like mountain bikers: these will flap in the wind, and other road bikers will point and laugh…


Light it Up


Day or night, flashing lights will alert oncoming motorists that a cyclist is ahead (assuming the driver isn't answering an email). Battery-operated lights typically feature blinking strobes front or back and flashing red lights on the rear for daytime use, and can be changed to a steady white headlight and steady red or combination of flashing and steady tail lights at night. Many are available with rechargeable batteries and a USB charging cable. The cost of lights is a small investment to cover your rear.
copyright © 2016-2018 scmrak


Next time I'll visit some road-bike essentials for improving your ride and for taking care of the most common roadside emergency: a flat tire.